Printer Driver Installation Method
First, connect the printer to the computer host, usually through a serial port or USB interface to connect to the computer host. Some printers also need to connect to the network through a wired or wireless network card.
Secondly, when the printer is connected to the computer host, press the printer's power button to turn it on.
Then, restart the operating system. After entering the system, the operating system will find new hardware devices and prompt to install drivers for the new devices.
Next, open the "Device Manager", click "Scan for hardware changes", and you can see the newly added device:
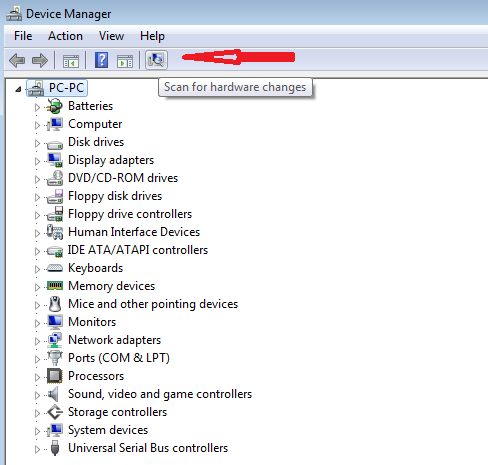
Note that "Unknown Device" must appear in the "Device Manager" and with a question mark icon at the back. This means that the printer has been successfully connected to the computer host, and then you can install the driver for the printer. Otherwise, the printer driver cannot be installed.
For example, if your printer is connected to the computer host via a USB interface, you can find the icon in the "Device Manager" as shown below:
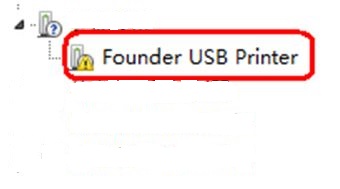
There are two ways to install the driver next:
The first method:
If there is a setup.exe file in the driver package, execute this file to install the driver for the printer. This process is very simple. The installation package will automatically install all the necessary driver files for you.

The second method:
Click on the device with the question mark icon just now.

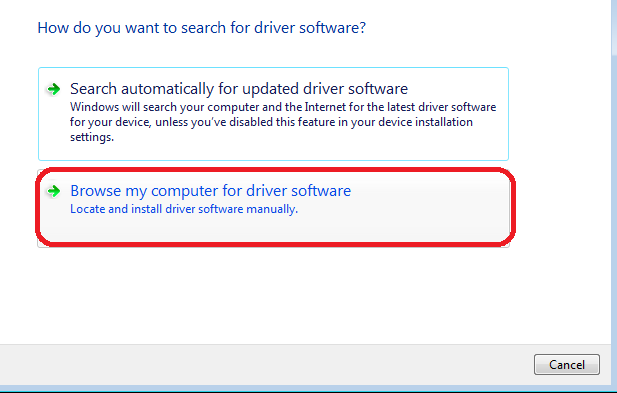
Right click the pop-up menu, select "Update Driver Software" in the menu, and then select "Browse my computer for driver software".
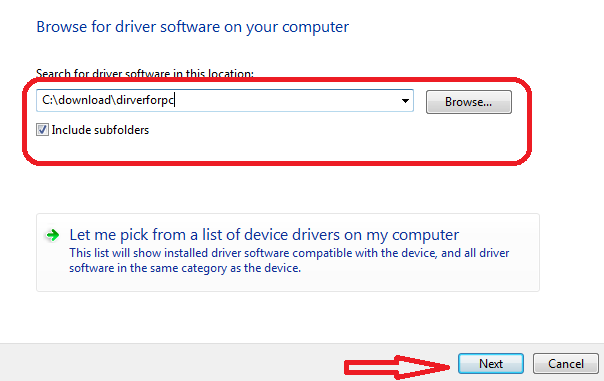
In the driver search directory, fill in the storage path of the driver file, and then click "Next". The system will search for the appropriate driver file and install it automatically. After the installation is complete, restart the system.
If the installation is successful, the "Unknown Device" in the "Device Manager" will become a printer device with a specific model name, similar to the following icon:
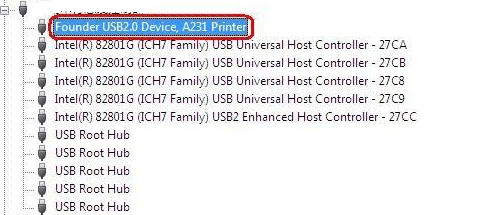
The place circled in red above is an icon of the printer after the driver is installed.
Secondly, when the printer is connected to the computer host, press the printer's power button to turn it on.
Then, restart the operating system. After entering the system, the operating system will find new hardware devices and prompt to install drivers for the new devices.
Next, open the "Device Manager", click "Scan for hardware changes", and you can see the newly added device:

Note that "Unknown Device" must appear in the "Device Manager" and with a question mark icon at the back. This means that the printer has been successfully connected to the computer host, and then you can install the driver for the printer. Otherwise, the printer driver cannot be installed.
For example, if your printer is connected to the computer host via a USB interface, you can find the icon in the "Device Manager" as shown below:

There are two ways to install the driver next:
The first method:
If there is a setup.exe file in the driver package, execute this file to install the driver for the printer. This process is very simple. The installation package will automatically install all the necessary driver files for you.

The second method:
Click on the device with the question mark icon just now.

Right click the pop-up menu, select "Update Driver Software" in the menu, and then select "Browse my computer for driver software".

In the driver search directory, fill in the storage path of the driver file, and then click "Next". The system will search for the appropriate driver file and install it automatically. After the installation is complete, restart the system.

If the installation is successful, the "Unknown Device" in the "Device Manager" will become a printer device with a specific model name, similar to the following icon:

The place circled in red above is an icon of the printer after the driver is installed.
Leave a Reply
 How to Manually Install Driver Files
After downloading the driver client, double-click to run the program, and then click the "Download Driver" button.At this time, the program will automatically download all the driver files.After the p…
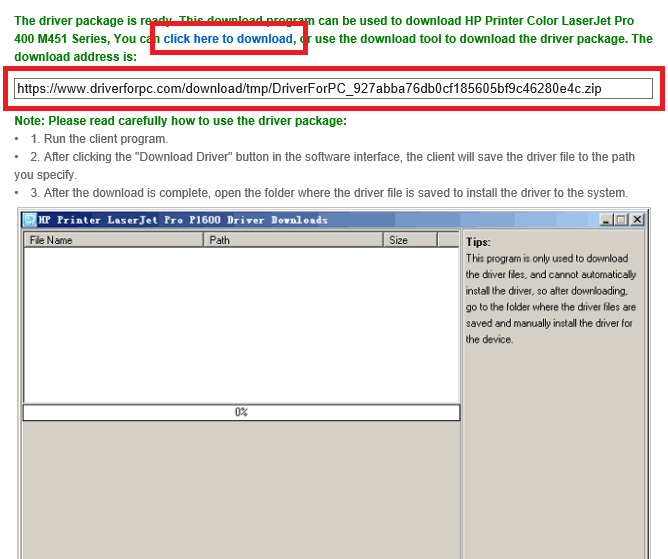 How to download and run the driver client
After you enter the correct verification code, you will get a driver client download address, as shown below:We provide two download methods:1 Click the blue font part to download directly using the b…
 Printer Driver Installation Method
First, connect the printer to the computer host, usually through a serial port or USB interface to connect to the computer host. Some printers also need to connect to the network through a wired or wi…
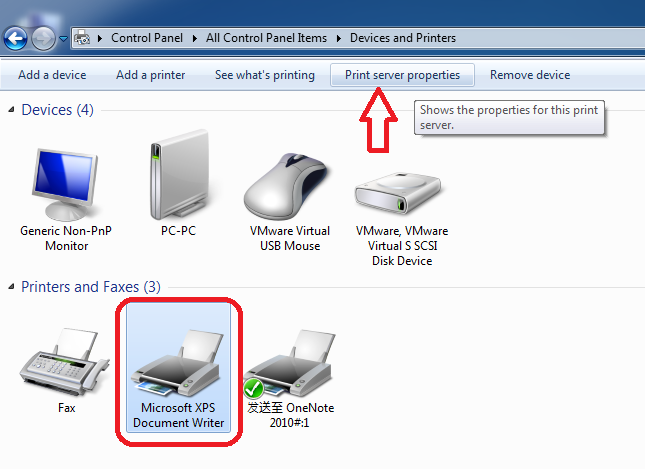 How to Manually Delete Printer Driver Under Windows System
Before deleting the printer, you must disconnect the USB cable between the printer and the computer host, and restart the computer.Do not perform any printing operations after restarting the computer.…
• Guest: [June 27, 2022] : Epson L3169 printer wifi fails, what should I do?
Reply: Step 1: Check if the printer is connected wirelessly (Wi-Fi).Models without a screen:The indicator l …view >>>
 Guest: [June 27, 2022] : Epson L3169 printer wifi fails, what should I do?
Reply: Step 1: Check if the printer is connected wirelessly (Wi-Fi).Models without a screen:The indicator l …view >>>
• Guest: [June 20, 2022] : The epson L1118 keeps prompting that the paper is not loaded correctly. What is the reason?
Reply: Usually, when it indicates that the paper is not loaded correctly, you can check whether the sensor …view >>>
 Guest: [June 20, 2022] : The epson L1118 keeps prompting that the paper is not loaded correctly. What is the reason?
Reply: Usually, when it indicates that the paper is not loaded correctly, you can check whether the sensor …view >>>
• Guest: [June 09, 2022] : How does epson L3153 print remotely?
Reply: 1. Log in to any mailbox, send an email to the printer, and the printer will automatically print the …view >>>
 Guest: [June 09, 2022] : How does epson L3153 print remotely?
Reply: 1. Log in to any mailbox, send an email to the printer, and the printer will automatically print the …view >>>
• Guest: [June 06, 2022] : Hello, my Epson L3119 printer has been used for more than two years. It has been normal before. Rece …
Reply: For a printer that has been used for a long time, due to various reasons, there may be a problem wit …view >>>
 Guest: [June 06, 2022] : Hello, my Epson L3119 printer has been used for more than two years. It has been normal before. Rece …
Reply: For a printer that has been used for a long time, due to various reasons, there may be a problem wit …view >>>
• Guest: [May 30, 2022] : Mine is epson L3118. When I use it today, it shows error 000031 and the red light flashes twice. Is …
Reply: First, you can check the encoder disk and grating. If there is no abnormality, remove the cleaning u …view >>>
 Guest: [May 30, 2022] : Mine is epson L3118. When I use it today, it shows error 000031 and the red light flashes twice. Is …
Reply: First, you can check the encoder disk and grating. If there is no abnormality, remove the cleaning u …view >>>
• Guest: [May 12, 2022] : The recent color display of my computer is not very normal. I would like to ask what is the reason?
Reply: Such failures generally have the following reasons:1. Poor contact between the display card and the …view >>>
 Guest: [May 12, 2022] : The recent color display of my computer is not very normal. I would like to ask what is the reason?
Reply: Such failures generally have the following reasons:1. Poor contact between the display card and the …view >>>
 August 04, 2021
 Views: 1538